2025. 9. 10. 13:38ㆍ모바일어플개발/Flutter Tips
안녕하세요~ totally 개발자입니다.
이 포스팅에서는 Flutter 기반 앱을 인앱토스의 ait 번들로 생성하는 방법에 대해서 공유합니다.
인앱토스는 말그대로 토스 앱 안에 있는 미니앱을 말하며, Reactive Native, Webview, Flutter, Unity 등 여러 플랫폼을 지원합니다.
그 중에 Flutter 기반 앱을 ait 번들로 생성해보도록 하겠습니다.
과정은 아래와 같습니다. (앱인토스 콘솔은 준비되어 있다고 가정합니다)
1) Flutter Web 빌드
2) Vite 프로젝트 생성
3) Vite 프로젝트에 앱인토스 SDK 설치
4) Flutter Web 빌드 결과물을 Vite 프로젝트의 public 폴더로 복사
5) Vite 프로젝트의 App.tsx 파일 수정
6) Vite 프로젝트에서 ait 세팅 (npx init ait)
7) Vite 프로젝트에서 npm run build로 .ait 번들 파일 생성
8) 앱인콘솔 출시하기에 .ait 번들 파일 업로드
Step 1: 먼저 플러터 프로젝트에서 flutter build web 명령어 실행에 문제가 없는 상태여야 합니다(Flutter package에 따라 웹 지원이 안 되는 부분이 있는데 이런 부분부터 해결해야 합니다) 아래 명령어를 입력합니다. 아래 명령어 중에 canvaskit을 html로 변환해도 작동 됩니다. (만약 이미지 부분 CORS 이슈 뜨는 분들은 flutter build web --web-renderer html --release 명령어로도 시도해보시기 바랍니다)
flutter build web --web-renderer canvaskit --release
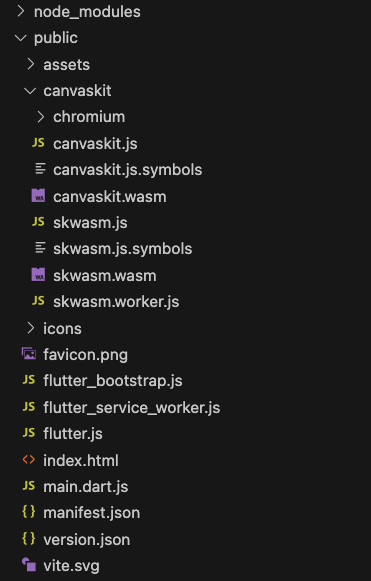
그러면 아래와 같이 build/web 경로에 파일들이 생성됩니다.

Step 2: 새로운 Vite 프로젝트를 만들어줍니다.
npm create vite@latest test-vite-project -- --template react-ts
Step 3: 생성된 Vite 프로젝트를 에디터로 열어주시고 아래 명령어를 순차적으로 입력합니다.
npm install

npm install @apps-in-toss/web-framework
Step 4: Step 1에서 만들어진 build/web 파일들을 모두 복사하여 Vite 프로젝트의 public 폴더 내에 모두 넣어줍니다.
Step 5: App.tsx 부분을 아래와 같이 작성해서 넣어줍니다.
import { useEffect } from "react";
import "./App.css";

function App() {
  useEffect(() => {
    // Load the Flutter JavaScript files dynamically
    const loadFlutterApp = () => {
      const flutterScript = document.createElement("script");
      flutterScript.src = "/flutter.js"; // Path to your flutter.js file in public
      flutterScript.onload = () => {
        // Once the script is loaded, you can initialize the Flutter app
        const flutterContainer = document.getElementById("flutter-container");
        if (flutterContainer) {
          // This is where the Flutter app will be mounted
          const script = document.createElement("script");
          script.src = "/main.dart.js"; // Path to the main Dart compiled JS file
          flutterContainer.appendChild(script);
        }
      };
      document.body.appendChild(flutterScript);
    };

    loadFlutterApp(); // Call the function to load the Flutter app
  }, []); // Empty dependency array to run once when the component is mounted

  return (
    <div className="App">
      <div
        id="flutter-container"
        style={{ width: "100%", height: "100vh" }}
      ></div>
    </div>
  );
}

export default App;
Step 6: Vite 프로젝트 터미널을 열어서 npx init ait 명령어를 입력합니다. 몇 가지를 물어보는데, 앱 이름(앱인콘솔에 있는 앱 이름 입력, 웹 번들러의 dev 명령어(vite), 웹 번들러의 build 명렁어(tsc -b && vite build), Enter web port(5173)) 입력하고 넘어가면 됩니다.

Step 7: npm run dev로 테스트해본 후에, 문제가 없어 출시하고자 하는 경우, npm run build 명령어를 입력하면 루트 경로에 .ait 번들이 생성된 것을 확인해볼 수 있습니다.
Step 8: 이 .ait 번들을 인앱토스 출시하기에 올리시면 됩니다.
개발에 도움이 되었기를 바랍니다. 감사합니다.
References:
https://developers-apps-in-toss.toss.im/porting_tutorials/vite_unity.html
https://developers-apps-in-toss.toss.im/tutorials/webview.html