2023. 11. 26. 14:40ㆍ모바일어플개발/Flutter 실전어플 개발
안녕하세요~ totally 개발자입니다.
저번 포스팅까지는 UI구성에 대해 살펴보았고, 이번 포스팅에서는 본격적인 로직 구성을 들어가보도록 하겠습니다.
Step 1: 먼저 pubspec.yaml 파일을 열어 shared_preferences 패키지를 입력하고 flutter pub get 해줍니다. 장바구니는 별도의 서버 데이터베이스가 아닌 shared_preferences 패키지를 통해 간단하게 디스크에 저장하고 불러올 것입니다.

이전에 shared_preferences를 설명한 포스팅이 있으니 자세한 내용은 아래를 통해 확인해주시면 됩니다.
https://totally-developer.tistory.com/54
[023] 플러터 (Flutter) 배우기 - Shared Preferences (디스크에 간단한 데이터 저장)
안녕하세요~ totally 개발자입니다. SharedPreferences 오늘 살펴볼 부분은 SharedPreferences입니다. 간단한 자료를 디스크에 저장할 때 유용하게 사용되며 방대한 자료는 이 방법을 권장하지 않습니다. 이
totally-developer.tistory.com
Step 2: Shared Preferences 사용을 위해 constants.dart 파일을 열어서 2번째, 6-9번째 줄을 추가해줍니다. 제가 포스팅에서는 이렇게 진행했으나 실무에서는 이렇게 하는 것보다는 별도 싱글톤 클래스 생성 또는 get_it 패키지를 통해서 관리하는 등 더 체계적으로 사용하는 경우가 많습니다만 포스팅에서는 최대한 간단하게 따라하실 수 있도록 하기 위함이니 참고해주시면 될 것 같습니다.

Step 3: main.dart에 2번째, 6,7번째 줄을 추가해줍니다. 여기에서는 WidgetsFlutterBinding.ensureInitialized() 함수를 반드시 호출해야 오류가 생기지 않습니다. 이 함수는 runApp 전에 호출해야 합니다.

Step 4: item_details_page.dart 파일을 열어서 수량을 위한 변수인 quantity를 추가해줍니다.

Step 5: Widget build 안에 Column의 children 안에 있는 Container 위젯들을 묶어서 정리해줍니다. Widget build 바깥에 붙여넣어주시면 됩니다.
1. productImageContainer 위젯 정리
Widget productImageContainer() {
return Container(
alignment: Alignment.center,
padding: const EdgeInsets.all(15),
child: CachedNetworkImage(
width: MediaQuery.of(context).size.width * 0.8,
fit: BoxFit.cover,
imageUrl: widget.productImageUrl,
placeholder: (context, url) {
return const Center(
child: CircularProgressIndicator(
strokeWidth: 2,
),
);
},
errorWidget: (context, url, error) {
return const Center(
child: Text("오류 발생"),
);
},
),
);
}
2. productNameContainer 위젯 정리
Widget productNameContainer() {
return Container(
padding: const EdgeInsets.symmetric(vertical: 20),
child: Text(
widget.productName,
textScaleFactor: 1.5,
style: const TextStyle(
fontWeight: FontWeight.bold,
),
),
);
}
3. productPriceContainer 위젯 정리
Widget productPriceContainer() {
return Container(
padding: const EdgeInsets.symmetric(vertical: 10),
child: Text(
"${numberFormat.format(widget.price)}원",
textScaleFactor: 1.3,
),
);
}
4. 이번에는 quantity을 위한 코드 블럭이며 productQuantityContainer 위젯으로 정리합니다. 여기에서 - 버튼을 누르면 수량이 1초과시 -1 해주고 + 버튼을 누르면 수량을 1 늘려주는 코드입니다.
Widget productQuantityContainer() {
return Container(
padding: const EdgeInsets.symmetric(vertical: 10),
child: Row(
mainAxisSize: MainAxisSize.min,
children: [
const Text("수량: "),
IconButton(
onPressed: () {
setState(() {
if (quantity > 1) {
quantity--;
}
});
},
icon: const Icon(Icons.remove, size: 24),
),
Text("$quantity"),
IconButton(
onPressed: () {
setState(() {
quantity++;
});
},
icon: const Icon(Icons.add, size: 24),
),
],
),
);
}
5. 수량과 단가를 곱한 총 상품금액을 표시할 productTotalPriceContainer 위젯을 만들어서 정리합니다.
Widget productTotalPriceContainer() {
return Container(
padding: const EdgeInsets.symmetric(vertical: 10),
child: Row(
mainAxisSize: MainAxisSize.min,
children: [
const Text(
"총 상품금액: ",
textScaleFactor: 1.3,
style: TextStyle(
fontWeight: FontWeight.bold,
),
),
Text(
"${numberFormat.format(widget.price * quantity)}원",
textScaleFactor: 1.3,
style: const TextStyle(
fontWeight: FontWeight.bold,
),
),
],
),
);
}
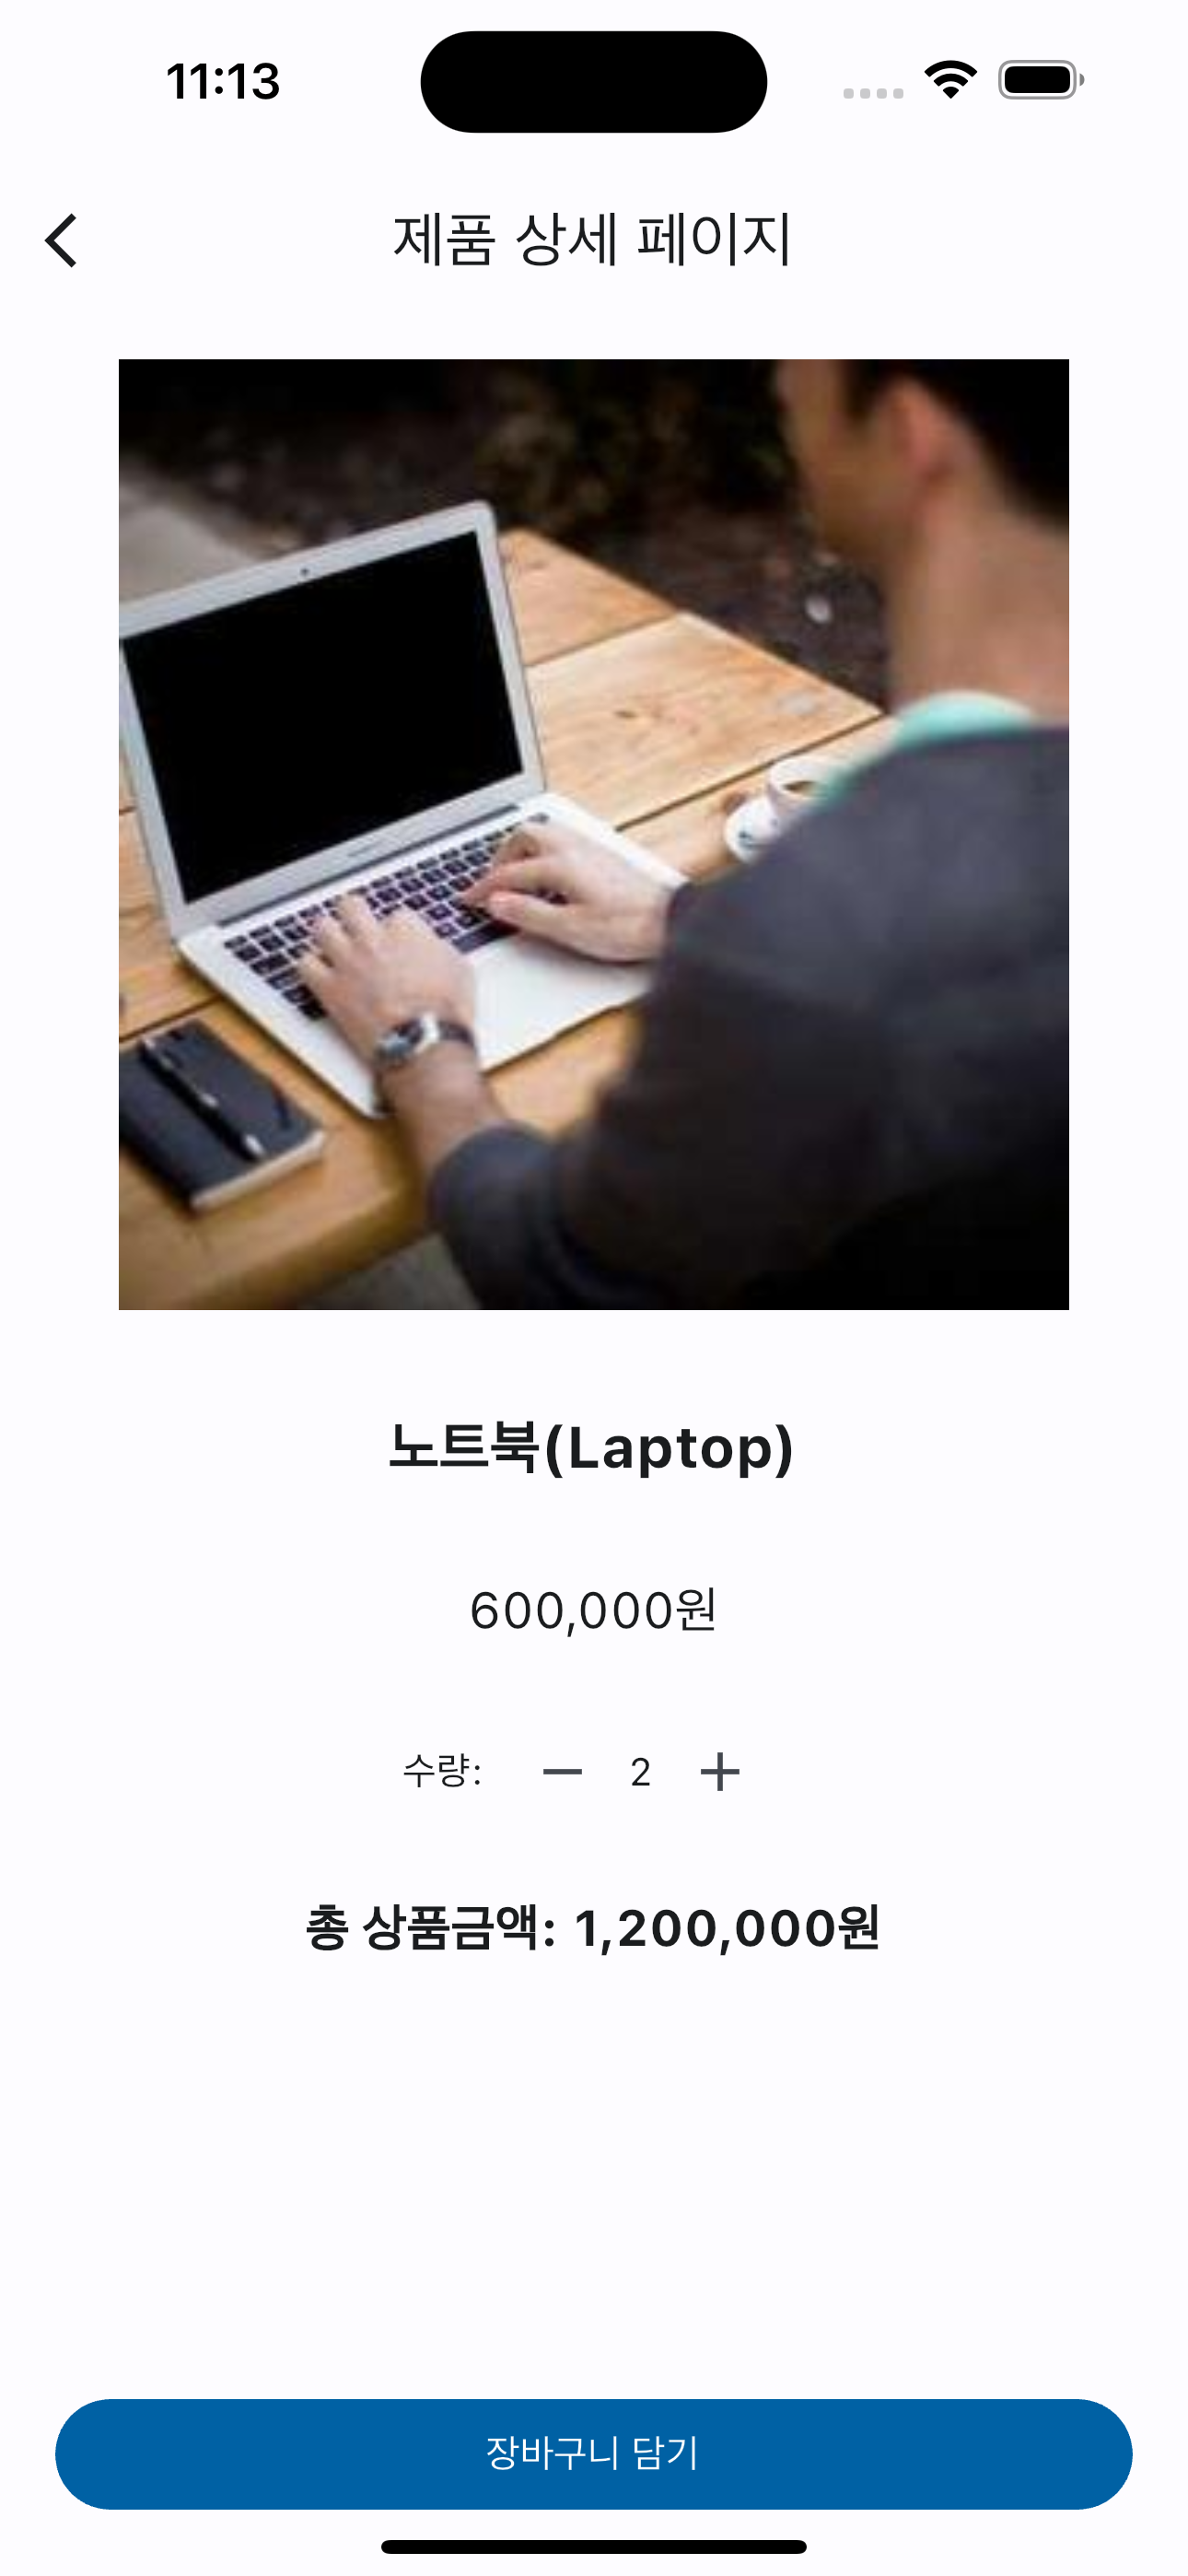
그 후 Column 위젯 안에는 43-47번째 줄처럼 각 위젯들을 나열해주시면 됩니다.

결과는 아래와 같습니다.

Step 6: 장바구니 버튼을 눌렀을 때의 로직을 작성합니다.
Map 형태로 저장하며 제품 번호가 키(Key), 추가된 수량이 값(Value)가 됩니다. 즉 {1: 3, 2: 4}에서 1: 3은 1번 제품이 3개, 2:4는 2번 제품이 4개라는 뜻입니다.

자세한 설명은 아래 유튜브 강좌에 남겼습니다.
다음 포스팅에서는 각 상세페이지에서 담은 제품들을 장바구니 페이지에서 불러와서 나열하고 수량도 조절할 수 있도록 진행해보겠습니다. 감사합니다.
[전체 소스 코드]
[item_details_page.dart]
import 'dart:convert'; | |
import 'package:flutter/material.dart'; | |
import 'package:cached_network_image/cached_network_image.dart'; | |
import 'package:project/constants.dart'; | |
import 'package:project/item_basket_page.dart'; | |
import 'package:project/models/cartProduct.dart'; | |
class ItemDetailsPage extends StatefulWidget { | |
int productNo; | |
String productName; | |
String productImageUrl; | |
double price; | |
ItemDetailsPage( | |
{super.key, | |
required this.productNo, | |
required this.productName, | |
required this.productImageUrl, | |
required this.price}); | |
@override | |
State<ItemDetailsPage> createState() => _ItemDetailsPageState(); | |
} | |
class _ItemDetailsPageState extends State<ItemDetailsPage> { | |
int quantity = 1; | |
@override | |
void initState() { | |
super.initState(); | |
} | |
@override | |
Widget build(BuildContext context) { | |
return Scaffold( | |
appBar: AppBar( | |
title: const Text("제품 상세 페이지"), | |
centerTitle: true, | |
), | |
body: SingleChildScrollView( | |
child: Column( | |
children: [ | |
productImageContainer(), | |
productNameContainer(), | |
productPriceContainer(), | |
productQuantityContainer(), | |
productTotalPriceContainer(), | |
], | |
), | |
), | |
bottomNavigationBar: Padding( | |
padding: const EdgeInsets.all(20), | |
child: FilledButton( | |
onPressed: () { | |
//! 임시 장바구니 변수 Map 선언 - 디스크에서 받아옴 | |
Map<String, dynamic> cartMap = | |
json.decode(sharedPreferences.getString("cartMap") ?? "{}") ?? | |
{}; | |
//! 장바구니에 해당 제품이 없으면 | |
if (cartMap[widget.productNo.toString()] == null) { | |
cartMap.addAll({widget.productNo.toString(): quantity}); | |
} else { | |
//! 제품이 있으면 | |
cartMap[widget.productNo.toString()] += quantity; | |
} | |
//! 디스크에 다시 반영 | |
sharedPreferences.setString("cartMap", json.encode(cartMap)); | |
print(cartMap); | |
//! 장바구니 페이지로 이동 | |
Navigator.of(context).push(MaterialPageRoute(builder: (context) { | |
return const ItemBasketPage(); | |
})); | |
}, | |
child: const Text("장바구니 담기"), | |
), | |
), | |
); | |
} | |
Widget productImageContainer() { | |
return Container( | |
alignment: Alignment.center, | |
padding: const EdgeInsets.all(15), | |
child: CachedNetworkImage( | |
width: MediaQuery.of(context).size.width * 0.8, | |
fit: BoxFit.cover, | |
imageUrl: widget.productImageUrl, | |
placeholder: (context, url) { | |
return const Center( | |
child: CircularProgressIndicator( | |
strokeWidth: 2, | |
), | |
); | |
}, | |
errorWidget: (context, url, error) { | |
return const Center( | |
child: Text("오류 발생"), | |
); | |
}, | |
), | |
); | |
} | |
Widget productNameContainer() { | |
return Container( | |
padding: const EdgeInsets.symmetric(vertical: 20), | |
child: Text( | |
widget.productName, | |
textScaleFactor: 1.5, | |
style: const TextStyle( | |
fontWeight: FontWeight.bold, | |
), | |
), | |
); | |
} | |
Widget productPriceContainer() { | |
return Container( | |
padding: const EdgeInsets.symmetric(vertical: 10), | |
child: Text( | |
"${numberFormat.format(widget.price)}원", | |
textScaleFactor: 1.3, | |
), | |
); | |
} | |
Widget productQuantityContainer() { | |
return Container( | |
padding: const EdgeInsets.symmetric(vertical: 10), | |
child: Row( | |
mainAxisSize: MainAxisSize.min, | |
children: [ | |
const Text("수량: "), | |
IconButton( | |
onPressed: () { | |
setState(() { | |
if (quantity > 1) { | |
quantity--; | |
} | |
}); | |
}, | |
icon: const Icon(Icons.remove, size: 24), | |
), | |
Text("$quantity"), | |
IconButton( | |
onPressed: () { | |
setState(() { | |
quantity++; | |
}); | |
}, | |
icon: const Icon(Icons.add, size: 24), | |
), | |
], | |
), | |
); | |
} | |
Widget productTotalPriceContainer() { | |
return Container( | |
padding: const EdgeInsets.symmetric(vertical: 10), | |
child: Row( | |
mainAxisSize: MainAxisSize.min, | |
children: [ | |
const Text( | |
"총 상품금액: ", | |
textScaleFactor: 1.3, | |
style: TextStyle( | |
fontWeight: FontWeight.bold, | |
), | |
), | |
Text( | |
"${numberFormat.format(widget.price * quantity)}원", | |
textScaleFactor: 1.3, | |
style: const TextStyle( | |
fontWeight: FontWeight.bold, | |
), | |
), | |
], | |
), | |
); | |
} | |
} |
[유튜브 강좌 영상]
'모바일어플개발 > Flutter 실전어플 개발' 카테고리의 다른 글
[011] 플러터 (Flutter) 실전어플제작 - 쇼핑몰 앱 제작(로직구성3 - 파이어베이스 연동) (3) | 2023.12.21 |
---|---|
[010] 플러터 (Flutter) 실전어플제작 - 쇼핑몰 앱 제작(로직구성2 - 장바구니 제품 수정) (3) | 2023.12.04 |
[008] 플러터 (Flutter) 실전어플제작 - 쇼핑몰 앱 제작(UI구성8 - 제품 주문조회 페이지 만들기) (2) | 2023.11.18 |
[007] 플러터 (Flutter) 실전어플제작 - 쇼핑몰 앱 제작(UI구성7 - 제품 주문완료 페이지 만들기) (0) | 2023.11.11 |
[006] 플러터 (Flutter) 실전어플제작 - 쇼핑몰 앱 제작(UI구성6 - 제품 결제시작 페이지 만들기 3) (1) | 2023.11.04 |