2023. 3. 13. 15:54ㆍ모바일어플개발/Flutter
안녕하세요~ totally 개발자입니다.
Firebase Authentication
오늘 알아볼 부분은 Firebase Authentication 인증 관련 내용입니다. 이 Authentication를 사용하여 이메일 인증, 휴대전화 인증 등을 간단하게 구축할 수 있습니다.
Step 1: 콘솔 -> 프로젝트 들어가신 뒤 Authentication를 눌러줍니다.

Step 2: 아래에 시작하기 버튼을 클릭해줍니다.

Step 3: 이메일/비밀번호 부분을 선택해줍니다.

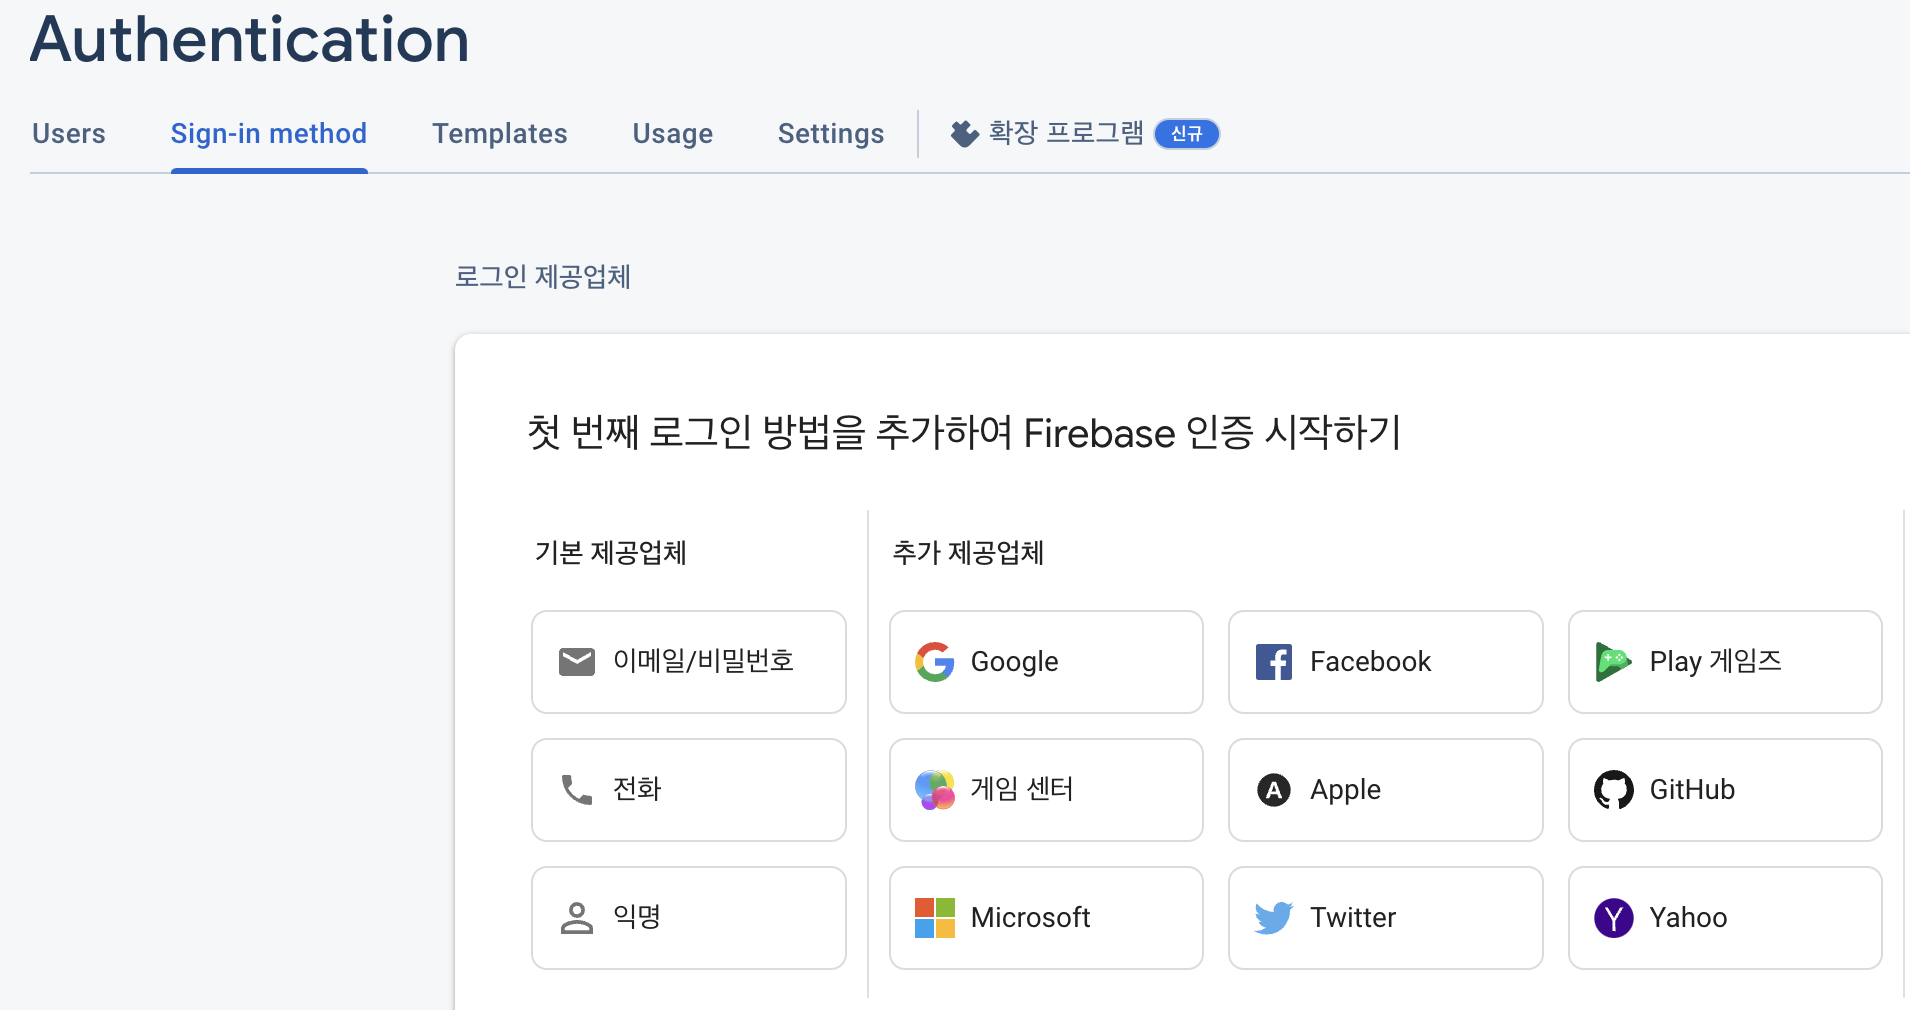
Step 4: 다음처럼 사용 설정 해주시고 저장해줍니다.

Step 5: 플러터 코드를 작성해줍니다. 예제에 사용한 파일은 총 4개입니다. (main.dart, login.dart, signup.dart, home.dart)
[main.dart]
Future<void> main() async {
WidgetsFlutterBinding.ensureInitialized();
await Firebase.initializeApp();
runApp(const MyApp());
}
이렇게 구성해주셔서 파이어베이스를 먼저 초기화해준 뒤 app를 실행합니다.
import 'package:firebase_core/firebase_core.dart'; | |
import 'package:firebase_project/home.dart'; | |
import 'package:firebase_project/login.dart'; | |
import 'package:firebase_project/signup.dart'; | |
import 'package:flutter/material.dart'; | |
Future<void> main() async { | |
WidgetsFlutterBinding.ensureInitialized(); | |
await Firebase.initializeApp(); | |
runApp(const MyApp()); | |
} | |
class MyApp extends StatelessWidget { | |
const MyApp({super.key}); | |
@override | |
Widget build(BuildContext context) { | |
return MaterialApp( | |
title: 'Flutter Demo', | |
theme: ThemeData( | |
primarySwatch: Colors.blue, | |
), | |
initialRoute: '/', | |
routes: { | |
'/': (context) => const HomePage(), | |
'/login': (context) => const LoginPage(), | |
'/signup': (context) => const SignupPage(), | |
}, | |
); | |
} | |
} |
[login.dart]
중점적인 부분은 await FirebaseAuth.instance.signInWithEmailAndPassword를 사용해서 로그인을 구현합니다.
import 'package:firebase_auth/firebase_auth.dart'; | |
import 'package:flutter/material.dart'; | |
class LoginPage extends StatefulWidget { | |
const LoginPage({super.key}); | |
@override | |
State<LoginPage> createState() => _LoginPageState(); | |
} | |
class _LoginPageState extends State<LoginPage> { | |
final _key = GlobalKey<FormState>(); | |
final TextEditingController _emailController = TextEditingController(); | |
final TextEditingController _pwdController = TextEditingController(); | |
@override | |
Widget build(BuildContext context) { | |
return Scaffold( | |
appBar: AppBar(title: const Text("Firebase App")), | |
body: Container( | |
padding: const EdgeInsets.all(15), | |
child: Center( | |
child: Form( | |
key: _key, | |
child: Column( | |
mainAxisSize: MainAxisSize.min, | |
children: [ | |
emailInput(), | |
const SizedBox(height: 15), | |
passwordInput(), | |
const SizedBox(height: 15), | |
loginButton(), | |
const SizedBox(height: 15), | |
TextButton( | |
onPressed: () => Navigator.pushNamed(context, '/signup'), | |
child: const Text( | |
"Sign Up", | |
), | |
), | |
], | |
), | |
), | |
), | |
), | |
); | |
} | |
TextFormField emailInput() { | |
return TextFormField( | |
controller: _emailController, | |
autofocus: true, | |
validator: (val) { | |
if (val!.isEmpty) { | |
return 'The input is empty.'; | |
} else { | |
return null; | |
} | |
}, | |
decoration: const InputDecoration( | |
border: OutlineInputBorder(), | |
hintText: 'Input your email address.', | |
labelText: 'Email Address', | |
labelStyle: TextStyle( | |
fontSize: 18, | |
fontWeight: FontWeight.bold, | |
), | |
), | |
); | |
} | |
TextFormField passwordInput() { | |
return TextFormField( | |
controller: _pwdController, | |
obscureText: true, | |
autofocus: true, | |
validator: (val) { | |
if (val!.isEmpty) { | |
return 'The input is empty.'; | |
} else { | |
return null; | |
} | |
}, | |
decoration: const InputDecoration( | |
border: OutlineInputBorder(), | |
hintText: 'Input your password.', | |
labelText: 'Password', | |
labelStyle: TextStyle( | |
fontSize: 18, | |
fontWeight: FontWeight.bold, | |
), | |
), | |
); | |
} | |
ElevatedButton loginButton() { | |
return ElevatedButton( | |
onPressed: () async { | |
if (_key.currentState!.validate()) { | |
// 여기에 작성 | |
try { | |
await FirebaseAuth.instance | |
.signInWithEmailAndPassword( | |
email: _emailController.text, password: _pwdController.text) | |
.then((_) => Navigator.pushNamed(context, "/")); | |
} on FirebaseAuthException catch (e) { | |
if (e.code == 'user-not-found') { | |
debugPrint('No user found for that email.'); | |
} else if (e.code == 'wrong-password') { | |
debugPrint('Wrong password provided for that user.'); | |
} | |
} | |
} | |
}, | |
child: Container( | |
padding: const EdgeInsets.all(15), | |
child: const Text( | |
"Login", | |
style: TextStyle( | |
fontSize: 18, | |
), | |
), | |
), | |
); | |
} | |
} |
[signup.dart]
여기에서 제일 중요한 부분은 await FirebaseAuth.instance.createUserWithEmailAndPassword 부분이며 올바르게 이메일과 비밀번호를 잘 전달해주시면 됩니다.
import 'package:firebase_auth/firebase_auth.dart'; | |
import 'package:flutter/material.dart'; | |
class SignupPage extends StatefulWidget { | |
const SignupPage({super.key}); | |
@override | |
State<SignupPage> createState() => _SignupPageState(); | |
} | |
class _SignupPageState extends State<SignupPage> { | |
final _key = GlobalKey<FormState>(); | |
final TextEditingController _emailController = TextEditingController(); | |
final TextEditingController _pwdController = TextEditingController(); | |
@override | |
Widget build(BuildContext context) { | |
return Scaffold( | |
appBar: AppBar(title: const Text("Firebase App")), | |
body: Container( | |
padding: const EdgeInsets.all(15), | |
child: Center( | |
child: Form( | |
key: _key, | |
child: Column( | |
mainAxisSize: MainAxisSize.min, | |
children: [ | |
emailInput(), | |
const SizedBox(height: 15), | |
passwordInput(), | |
const SizedBox(height: 15), | |
submitButton(), | |
const SizedBox(height: 15), | |
], | |
), | |
), | |
), | |
), | |
); | |
} | |
TextFormField emailInput() { | |
return TextFormField( | |
controller: _emailController, | |
autofocus: true, | |
validator: (val) { | |
if (val!.isEmpty) { | |
return 'The input is empty.'; | |
} else { | |
return null; | |
} | |
}, | |
decoration: const InputDecoration( | |
border: OutlineInputBorder(), | |
hintText: 'Input your email address.', | |
labelText: 'Email Address', | |
labelStyle: TextStyle( | |
fontSize: 18, | |
fontWeight: FontWeight.bold, | |
), | |
), | |
); | |
} | |
TextFormField passwordInput() { | |
return TextFormField( | |
controller: _pwdController, | |
obscureText: true, | |
autofocus: true, | |
validator: (val) { | |
if (val!.isEmpty) { | |
return 'The input is empty.'; | |
} else { | |
return null; | |
} | |
}, | |
decoration: const InputDecoration( | |
border: OutlineInputBorder(), | |
hintText: 'Input your password.', | |
labelText: 'Password', | |
labelStyle: TextStyle( | |
fontSize: 18, | |
fontWeight: FontWeight.bold, | |
), | |
), | |
); | |
} | |
ElevatedButton submitButton() { | |
return ElevatedButton( | |
onPressed: () async { | |
if (_key.currentState!.validate()) { | |
// 여기에 작성 | |
try { | |
final credential = await FirebaseAuth.instance | |
.createUserWithEmailAndPassword( | |
email: _emailController.text, | |
password: _pwdController.text, | |
) | |
.then((_) => Navigator.pushNamed(context, "/")); | |
} on FirebaseAuthException catch (e) { | |
if (e.code == 'weak-password') { | |
print('The password provided is too weak.'); | |
} else if (e.code == 'email-already-in-use') { | |
print('The account already exists for that email.'); | |
} | |
} catch (e) { | |
print(e.toString()); | |
} | |
} | |
}, | |
child: Container( | |
padding: const EdgeInsets.all(15), | |
child: const Text( | |
"Sign Up", | |
style: TextStyle( | |
fontSize: 18, | |
), | |
), | |
), | |
); | |
} | |
} |
[home.dart]
여기에서는 StreamBuilder 위젯을 사용하여 사용자의 현재 인증 상태가 어떤지 실시간으로 알 수 있습니다. 또한 await FirebaseAuth.instance.signOut() 메소드를 활용해서 로그아웃을 구현할 수 있습니다.
import 'package:firebase_auth/firebase_auth.dart'; | |
import 'package:firebase_project/login.dart'; | |
import 'package:flutter/material.dart'; | |
class HomePage extends StatefulWidget { | |
const HomePage({super.key}); | |
@override | |
State<HomePage> createState() => _HomePageState(); | |
} | |
class _HomePageState extends State<HomePage> { | |
@override | |
Widget build(BuildContext context) { | |
return StreamBuilder( | |
stream: FirebaseAuth.instance.authStateChanges(), | |
builder: (BuildContext con, AsyncSnapshot<User?> user) { | |
if (!user.hasData) { | |
return const LoginPage(); | |
} else { | |
return Scaffold( | |
appBar: AppBar( | |
title: const Text("Firebase App"), | |
actions: [ | |
IconButton( | |
icon: const Icon(Icons.logout), | |
onPressed: () async => await FirebaseAuth.instance | |
.signOut() | |
.then((_) => Navigator.pushNamed(context, "/login")), | |
), | |
], | |
), | |
body: const Center( | |
child: Text("Successfully logged in!"), | |
), | |
); | |
} | |
}, | |
); | |
} | |
} |
Step 6:
Step : 다음처럼 회원가입을 진행합니다.


admin@gmail.com으로 회원가입 완료한 후 아래 화면인 파이어베이스 Authentication의 Users에 다음처럼 나오면 성공입니다.

우측 상단에 로그아웃 아이콘 버튼을 눌러서 로그아웃해줍니다.

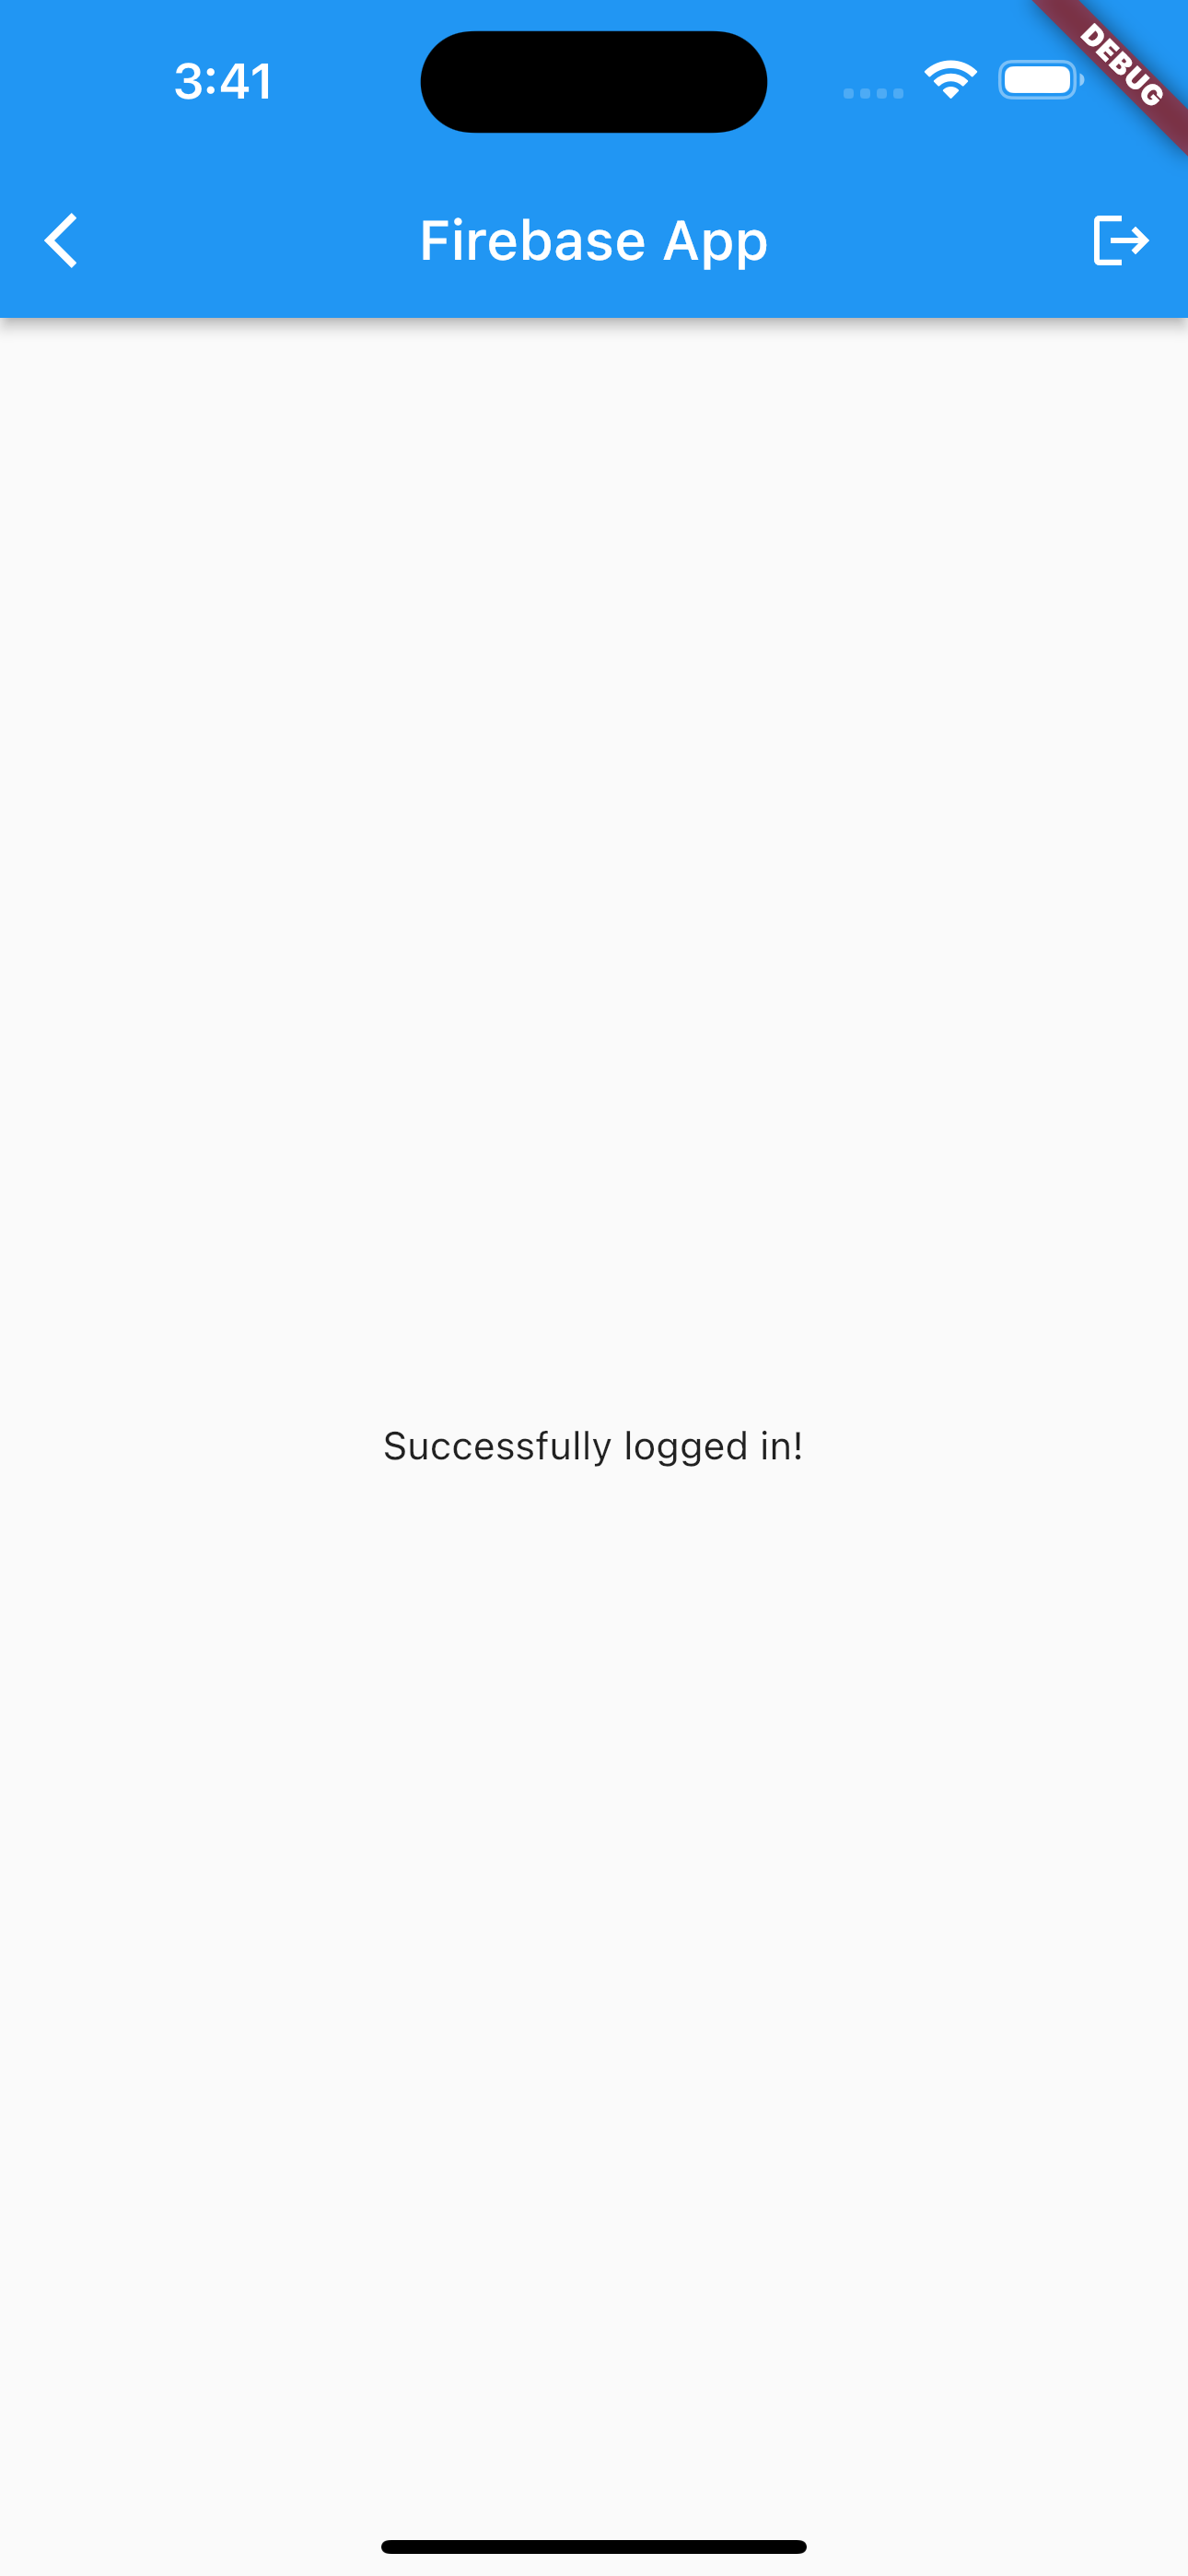
위처럼 로그인 화면이 나오면 성공입니다. 그 후 로그인 테스트 해보시고 다시 아래처럼 로그인되면 성공입니다.

References:
https://firebase.google.com/docs/auth/flutter/password-auth?hl=ko
Flutter에서 비밀번호 기반 계정으로 Firebase에 인증 | Firebase 문서
Google I/O 2022에서 Firebase의 새로운 기능을 확인하세요. 자세히 알아보기 의견 보내기 Flutter에서 비밀번호 기반 계정으로 Firebase에 인증 컬렉션을 사용해 정리하기 내 환경설정을 기준으로 콘텐츠
firebase.google.com
[유튜브 강좌 영상]
'모바일어플개발 > Flutter' 카테고리의 다른 글
[043] 플러터 (Flutter) 배우기 - MVVM 아키텍처 패턴 적용 (10) | 2023.03.21 |
---|---|
[042] 플러터 (Flutter) 배우기 - Firebase Auth 연동2 (휴대폰 문자 인증) (7) | 2023.03.17 |
[040] 플러터 (Flutter) 배우기 - Firebase(파이어베이스) 연동 (7) | 2023.03.13 |
[039] 플러터 (Flutter) 배우기 - Form, validator, TextFormField, Navigator 매개변수 전달하기 (0) | 2023.03.11 |
[038] 플러터 (Flutter) 배우기 - WebView (웹뷰) 구현하기 (0) | 2023.03.04 |